Hello Hat Lovers!
I recently made day 2 of my home regional in Vancouver, finishing 19th overall with a 10-4 record. While I would have liked to have gone further, I’m overall happy with my finish, and now that I have no more majors planned for Regulation F, I have decided to release the team that I have been working on for the past two months. There is still over a month left of this Regulation for many players with major events like EUIC still to come and I am hoping that stronger players than I can pick up the team and potentially have an even better finish. I think the CressBear archetype is really strong and still fairly underexplored. The Rental and Pokepaste are also included in this post!
Teambuilding
Regulation F felt like it had a large quantity of viable archetypes, more so than previous formats, and this made team building incredibly difficult early on. Very broadly speaking, the way to push for advantages at any stage in a meta game is to build and play more offensively even if means that you have to trade match ups, but I felt like many of the flavors of offense had too much of a rock-paper-scissors dynamic versus each other, and were overall too volatile given the sheer amount of Pokemon that they needed to cover. Thus, I decided to build a team that instead had as many neutral match ups as possible, and the way to accomplish this goal is to find a team that is stable and balanced, with the trade off being that it may be a challenge to create advantages. A team like this can prevent you from losing games quickly, giving you more chances to outplay your opponent.
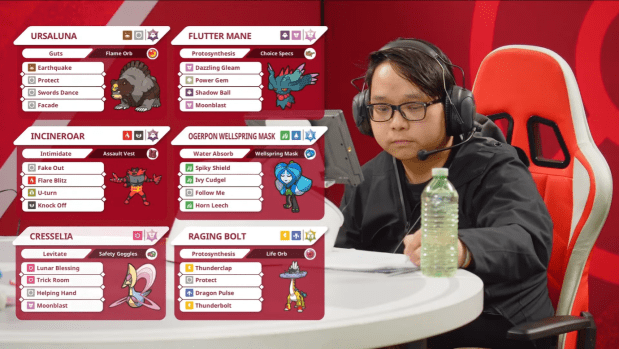
While Pokemon like Amoonguss, Ogerpon-Hearthflame, and Iron Hands were considered, I identified Flutter Mane / Ogerpon-Wellspring / Incineroar / Raging Bolt as the stable core that I desired. These four provided many team essentials like offensive coverage, defensive synergy, a mix of spread and single target attacks, redirection, Fake Out, Intimidate, priority, and a good balance of power and bulk. Beyond these four, I know that I still wanted to use Trick Room given that Semi-Room teams have always been my comfort pick in the decade that I’ve played VGC, and I also wanted a Ground type to round out the Fairy / Fire / Ground coverage that I make almost mandatory on all my teams. For a balance team, it is also important to have some tools to make progress so that you are not simply turtling and surviving in your games, and because of these reasons, I chose Cresselia and Regular Ursaluna as my final two Pokemon. Regular Ursaluna has one of the highest potential damage outputs in the game, with a strong spread move and a single target attack that can OHKO bulky Pokemon like Amoonguss with minimal set up, and it does so without sacrificing bulk.
![]()
![]()
![]()
![]()
![]()
![]()
These six do have similar qualities to the team that Florian Temme won Dortmund Regional with, and while I am a big fan of that team and strongly considered using it myself, I landed on my team for several reasons. Firstly, given my playstyle, I rely greatly on Flutter Mane + a slow Ground type as my main sources of damage. Given that they are both Special Attackers, Flutter Mane and Blood Moon Ursaluna have some trouble breaking Ogerpon-Wellspring with its +1 Special Defense boost after Tera, which was a Pokemon that was challenging the number one spot in usage when this team was first built. Not that Regular Ursaluna really has a great match up versus Ogerpon-Wellspring, but given that it is a physical attacker, it is slightly better than Blood Moon in that regard. Second, because I wanted to use Incineroar as my Fire type, I knew that I wanted my last two Pokemon to have a strong Amoonguss match up. For as stable as it is, Incineroar does not deal with Amoonguss as directly as more offensive options like Ogerpon-Hearthflame or Chi-Yu. Safety Goggles Cresselia + Flame Orb Ursaluna is one of the few Trick Room modes in the game that has a strong match up versus Amoonguss, and it was much better in that match up than Farigiraf and Blood Moon. This was essential for me as Amoonguss famously has a strong match up versus Trick Room in general. Third, I felt that Cresselia and Regular Ursaluna were more stable Pokemon overall. With Lunar Blessing and Regular Ursaluna’s pseudo immunity to status, the team had a lot of anti-hax tools, and these two Pokemon also have superior bulk to Blood Moon and Farigiraf. Lastly, because Farigiraf + Blood Moon has now become one of the most commonly used archetypes in Regulation F, I felt that opponents would have far more knowledge in how to approach that match up than Cresselia + Regular Ursaluna. Many players also often conflate having a Trick Room counter with having counters to special attackers. Snarl and Calm Mind Raging Bolt can counter Expanding Force and Blood Moon, but not the physical attacking Regular Ursaluna.
I don’t honestly believe that my team is “better” than Florian’s and would recommend that team instead for anyone looking for a similar vibe, but my team had specific advantages that suited my needs better. I am a big proponent of the idea that you’ll have a greater chance of success if you tend towards comfort rather than using a team that is theoretically stronger.

Flutter Mane @ Choice Specs
Ability: Protosynthesis
Shiny: Yes
Tera Type: Fairy
EVs: 52 HP / 100 Def / 100 SpA / 4 SpD / 252 Spe
Timid Nature
IVs: 0 Atk
– Dazzling Gleam
– Moonblast
– Shadow Ball
– Power Gem
- 252 Atk Sword of Ruin Chien-Pao Ice Spinner vs. 52 HP / 100 Def Flutter Mane: 118-139 (86.1 – 101.4%) — 12.5% chance to OHKO
- 252+ Atk Sword of Ruin Chien-Pao Sucker Punch vs. 52 HP / 100 Def Flutter Mane: 114-135 (83.2 – 98.5%) — guaranteed 2HKO
- 100 Atk Gouging Fire Heat Crash (120 BP) vs. 52 HP / 100 Def Flutter Mane: 114-135 (83.2 – 98.5%) — guaranteed 2HKO
- 252+ Atk Black Glasses Kingambit Sucker Punch vs. 52 HP / 100 Def Flutter Mane: 111-132 (81 – 96.3%) — guaranteed 2HKO
- 100 SpA Choice Specs Tera-Fairy Flutter Mane Helping Hand Shadow Ball vs. 84 HP / 4 SpD Landorus: 169-199 (96.5 – 113.7%) — 81.3% chance to OHKO
- 100 SpA Choice Specs Flutter Mane Helping Hand Shadow Ball vs. 20 HP / 44 SpD Glimmora: 160-189 (99.3 – 117.3%) — 93.8% chance to OHKO
This was the set that I had the most doubts about, as I have definitely missed KOes with the lowered special attack investment. I did not want to run glass Flutter Mane because I don’t like getting pinned by priority and stray physical attacks, and max speed felt necessary to have a better match up in the mirror. During the tournament Flutter Mane did survive an Aqua Jet + Grassy Glide double-up so the spread did its job, but there is room for improvement on the team by tweaking Flutter Mane’s EVs.
I generally prefer Trick Room as the last move on Flutter Mane for this team, but Power Gem was important for the match up against Snow, which had seen an outrageous spike in usage in the weeks leading up to Vancouver. Snow saw sparce usage at Vancouver and even more limited success, but I did play against it in round seven and in that set I was able to deny Aurora Veil with a Helping Hand boosted Power Gem. This line also played around Tera Fire, so the decision to run the move was correct in hindsight.
A lot of Flutter Mane these days run Speed Boosting Booster Energy with Icy Wind, but I felt that this team did not have the right Pokemon to benefit from that set and I was much more comfortable with how Specs functioned. This archetype usually has Single Strike Urshifu as the greatest beneficiary of Icy Wind, but I preferred Raging Bolt’s typing and the superior stability that comes with its bulk, even if it meant that I could not make good use of Icy Wind. Specs Flutter Mane creates a powerful duo with Ursaluna when you consider their Fairy + Ground coverage and the speed sandwich that they create.

Ogerpon-Wellspring @ Wellspring Mask
Ability: Water Absorb
Tera Type: Water
EVs: 236 HP / 4 Atk / 4 Def / 12 SpD / 252 Spe
Jolly Nature
– Ivy Cudgel
– Horn Leech
– Follow Me
– Spiky Shield
Just like Flutter Mane, max speed on Ogerpon felt necessary as much as I did not want to use it. The absolute slowest Ogerpon is allowed to be on this team is 169 to outrun Landorus-I, and at that point, I felt that I might as well run max speed to at least speed tie opposing Ogerpon. This decision paid off as I won a game at Vancouver in part because I won a speed tie on turn 1. The rest of the EVs were just meant to maximize bulk because Ogerpon also has an important role on the team as a redirector.
There are variants of this team that have Amoonguss over Ogerpon, but I preferred the latter because of its ability to pressure Pokemon like Glimmora, Chi-Yu, and Landorus-I. Even if they Tera Landorus, usually to Poison or Steel, it meant that they would be turning one of their Ground immunities into a Ground weakness, which made it an easier match up for Ursaluna.
Incineroar @ Assault Vest
Ability: Intimidate
Shiny: Yes
Tera Type: Ghost
EVs: 236 HP / 148 Atk / 4 Def / 108 SpD / 12 Spe
Adamant Nature
– Fake Out
– Flare Blitz
– Knock Off
– U-Turn
- 148+ Atk Incineroar Flare Blitz vs. 252 HP / 4 Def Rillaboom: 206-246 (99.5 – 118.8%) — 93.8% chance to OHKO
- 148+ Atk Incineroar Flare Blitz vs. 252 HP / 4 Def Gholdengo: 198-234 (102 – 120.6%) — guaranteed OHKO
- 252+ SpA Life Orb Sheer Force Landorus Earth Power vs. 236 HP / 108 SpD Assault Vest Incineroar: 172-203 (86 – 101.5%) — 6.3% chance to OHKO
- 12 Spe EVs to hit 82 stat to be one point faster than Cresselia. This allows Cresselia to Lunar Blessing before Incineroar can move under Trick Room to neutralize Spore. Having them one point apart was also useful to speed check opposing Pokemon
While much of my team building was spent largely polishing the sets, Incineroar was one Pokemon that saw a notable change relatively late in the process. I spent much of my testing with Sitrus Berry, but I had come to learn that this team functions a lot better if Incineroar is able to survive Landorus-I’s Earth Power, which can only be achieved with Assault Vest. Not being able to run Parting Shot was unfortunately a necessary sacrifice. I questioned the Tera a lot, but decided late that Ghost was probably the safest option, which did help me a great deal against double Fake Out teams. I also just ran out of time to test other options like Fairy. Knock Off was not used a lot in practice or at the tournament but I could not find a better option, and Assault Vest meant that possibilities like Will-O-Wisp were not available. U-Turn is obvious, but it is worth mentioning how important it is on the team to enable Ursaluna.

Raging Bolt @ Life Orb
Ability: Protosynthesis
Tera Type: Bug
EVs: 228 HP / 60 Def / 220 SpA
Modest Nature
IVs: 20 Atk
– Thunderbolt
– Thunderclap
– Dragon Pulse
– Protect
- 252+ Atk Sword of Ruin Chien-Pao Ice Spinner vs. 228 HP / 60 Def Raging Bolt: 192-228 (83.8 – 99.5%) — guaranteed 2HKO
- 10n – 1 HP stat to minimize Life Orb recoil
I used Life Orb on Raging Bolt as I did not feel that Assault Vest or Leftovers + Calm Mind fit the pace of the team very well. Much of the team revolves around deciding in team preview whether I can lean on Cresselia + Ursaluna, and the most common time that the answer was “no” was versus double Fake Out teams with Incineroar + Rillaboom. Given that those two are also commonly paired with Urshifu-Rapid-Strike, Life Orb was the item that allowed me to make the most progress, as with chip damage a Life Orb boosted Thunderclap could pin their Flutter Mane, a common fourth Pokemon to that FWG core. With Flutter Mane neutralized, Raging Bolt’s Dragon typing often allowed it to solo FWG defensive cores that gave my other sources of damage some trouble. In general, the item made Raging Bolt more immediately threatening. LO also gave me a secondary Trick Room mode which made Cresselia easier to bring, as a problem it would have was sometimes it was forced to also come with Ursaluna in order to have full value. This is also the reason why I ran zero speed EVs on my Raging Bolt, as I felt that it took too much investment to reliably outrun other Raging Bolt, and I felt that its stats were better maximized by focusing solely on bulk and power. I considered running different permutations with Quiet and/or 20 Speed IV, but ultimately decided that Modest with a Bottle Capped speed stat gave me the most defined speed tier.
Dragon Pulse was used instead of Draco Meteor so I that could have more sustained offense versus Electric resists like Rillaboom. In my stream set, Dragon Pulse was important to 2HKO Amoonguss and still be threatening afterwards, which Draco Meteor would not have been able to do. In addition, Dragon Pulse is the best move that Raging Bolt can use into Substitute Landorus. Not for nothing, Dragon Pulse also meant that the team did not have a single inaccurate move, a luxury that is often very difficult to come by.
Tera Bug was used to resist Landorus-I and Ground moves in general. The reason it is used over other Ground resists like Grass or Flying is that Bug maintains a neutrality versus Chien-Pao and Flutter Mane, the two other biggest threats to Raging Bolt.
Ursaluna @ Flame Orb
Ability: Guts
Level: 50
Shiny: Yes
Tera Type: Ghost
EVs: 252 HP / 252 Atk / 4 SpD
Brave Nature
IVs: 14 SpA / 0 Spe
– Earthquake
– Facade
– Swords Dance
– Protect
The most standard Ursaluna set. I considered other moves over Swords Dance but decided that the move was too important to counteract Intimidate. Tera Ghost was essential to block Fake Out, a common anti Trick Room tool, even for as much as I hated acquiring a weakness to Sucker Punch. I also considered running more bulk, but there were too many rogue calcs that came up that necessitated max attack.

Cresselia @ Safety Goggles
Ability: Levitate
Shiny: Yes
Tera Type: Fairy
EVs: 236 HP / 116 Def / 156 SpD
Sassy Nature
IVs: 21 Atk / 0 Spe
– Moonblast
– Trick Room
– Lunar Blessing
– Helping Hand
- 252 SpA Choice Specs Beads of Ruin Chi-Yu Dark Pulse vs. 236 HP / 156+ SpD Cresselia: 192-228 (85.3 – 101.3%) — 6.3% chance to OHKO
- Jump point for Special Defense
Also a vanilla set. Mental Herb and Sitrus Berry were considered, but I decided that I wanted my Trick Room mode to completely lock out Amoonguss, and I felt that it was reasonable to simply play around Taunt. I leaned towards making Cresselia more specially bulky as I felt that it maximized its overall bulk the best, even if it did mean that I could not survive Tera Dark Wicked Blow.
Protect and Ally Switch were also considered. Protest was an idea from Gary Qian, another Bearliever from the PNW, and Ally Switch had value in playing around single target threats like Kingambit, but ultimately, I concluded that Helping Hand had the most value overall, especially with the non-Trick Room mode. This was especially important because sometimes this team felt like a 4 + 2 team and allowing Cresselia to have more value outside of being a Trick Room bot was appreciated.
Other Teras like Fire and Dark were considered. Dark in particular has secondary value in blocking Prankster Taunt, but I felt that Fairy was too important to resist Cressselia’s most common weakness versus Dark types and being a more neutral type overall than Dark, which has an unfortunate Fairy weakness. Lastly, while the benefit is not that large, gaining STAB on Moonblast was also a bonus.
The 21 Attack IV, along with the 14 Special Attack IV on Ursaluna, are simply what I had in game. I do have a Cresselia that has minimum attack and speed IV, but I wanted to use the shiny one that I transferred from Pokemon Go that luckily rolled a 0 speed IV upon transferring.
—
Schedule and Notable Match Ups

I played Raghav twice at Vancouver, losing on day 1 and winning on day 2. In game 1 of our round 2 set, I brought Cresselia and Ursaluna because I am generally more comfortable with using Trick Room to handle Landorus-I. This proved to be difficult as not only did Raghav not bring Landorus, but Flutter Mane virtually locked Cresselia out of the game with Taunt, which also made it a challenge to accomplish anything with Ursaluna. We brought the same Pokemon in game 2 and it played out much the same way as the first game. Given how cleanly they won game 1 I should have deduced that they’d likely bring the same Pokemon in game 2, which meant that I should have adjusted and left the Trick Room mode behind.
In our rematch, I did indeed choose to bench Cresselia and Ursaluna, opting instead to bring Flutter Mane and Ogerpon, along with Raging Bolt and Incineroar. The gameplan was to at least get their Flutter Mane in range of a Thunderclap, and Raging Bolt could then solo Incineroar / Rillaboom / Urshifu. I was able to get my own Flutter Mane in position to KO their Flutter Mane with Shadow Ball and took game 1 as a result. They brought Landorus over Flutter Mane in game 2 which made things more difficult, but I knew that without speed control, my own Flutter Mane could be a big threat as it outsped their whole team. I did have to win a speed tie and my Flutter Mane survived a double up from Aqua Jet + Grassy Glide which allowed me to take the set.
In round 5, I took my second loss of day 1 to Layn Sheppard, who was using the marcofiero Sun team. I burnt out in the weeks leading up to Vancouver and neglected to practice this match up. I didn’t have a great feel for what Pokemon I should have brought, and was also too weenie to make reads that in hindsight would have won me a game. Torkoal is a big threat to my team as it underspeeds my Ursaluna, and Farigiraf meant that it was difficult to get full value out of Incineroar. I also got read pretty hard on a turn where their Walking Wake used Flamethrower on my Raging Bolt, catching it turning into a Bug type.
In round 10, I played fellow US Nationals finalist Aaron Traylor in seemingly a mirror match, but the fact that he had turbo Ursaluna and Tornadus meant that our teams actually functioned very differently. I lost this set, but I felt that the match up was in my favor because I could play towards Aaron’s entire team being sandwiched in speed by Flutter Mane and Ursaluna. In game 1, I went for a Helping Hand + Shadow Ball into Urshifu to play around Tera Poison, and it switched into the Normal type Ursaluna. Yikes. This put me in a bad position that I could not recover from. We brought the same leads and same backs in game 2, but I instead went for Helping Hand + Tera Fairy Moonblast into Incineroar to KO it, believing that the only truly negative outcome that could happen is if Aaron Faked Out my Ghost type Flutter Mane. I was in a favorable position versus his two bears, one locked into Poison Jab and the other without its Flame Orb activated yet, however, I proceed to blunder horribly after I got my own bear in position under Trick Room. I could have made a principled read predicting a switch to Cresselia + Protect. This forced Urshifu to lock into Aqua Jet after Aaron’s Cresselia gets KOed by +2 Facade because both of his Pokemon would be pinned by a +2 Earthquake. However, locking into Aqua Jet meant that I could win the game outright with Ogerpon. The problem, though, was that I forgot that I still had one more Pokemon remaining and thought that I needed to Lunar Blessing my Ursaluna out of Aqua Jet range. Oops! I instead whiff a double Protect attempt and lose the game.
In round 14 I was matched with Brandon Davis and he led Iron Crown + Indeedee in both games. This lead is usually straightforward for me to deal with as that duo will always lose damage trades to Tera Ogerpon-Wellspring + Cresselia, however, I needed to lead differently to account for Brandon’s Gallade. Gallade is a very threatening Pokemon to my team and I need to lead very specifically to avoid automatically losing to it. My opponent also had their own Ogerpon-Wellspring, an uncommon Pokemon on this archetype, which meant that I couldn’t click Ivy Cudgel indiscriminately even if I led Ogerpon + Cresselia. I dropped both games pretty cleanly as a result of getting the leads wrong. I did not have the resistance to top cut even if I won, but losing this set did unfortunately also mean that I missed out on prize money that comes with finishing top 16.
Lastly and most notably, I was feautured on stream in my win-and-in on day 1! I would be playing Aaron Brok, the Drednaw guy from San Diego 2023. We also roomed together at Sacramento where he top cut and I made day 2.

Early on in Game 1, I had to call which slot he would Spore with Amoonguss, bring Safety Goggles Cresselia in that slot, and Ursaluna in the other. The position would have been fine had I called this successfully, but instead, Ursaluna got put to sleep and I could not find a position to heal it with Lunar Blessing. I tried to make a play where I KOed my own Ursaluna with U-Turn so that I could recycle Fake Out after a possible double Protect, but it did not work. Incineroar tried very hard to pull me back by getting back to back critical hit OHKOes, but unfortunately I needed a third from Raging Bolt. Game 1 ended up in a blowout in his favor.
Game 2, on the other hand, concluded as one of the most confusing games that I have played. After several turns of not getting calls right culminating in whiffing a Helping Hand + Facade into Amoonguss, forgetting that it had Tera Ghost, the set felt doomed. Then all of a sudden, without an obvious hero play or glaring blunder from Aaron’s end, I somehow found myself in a winning position? It took several rewatches to understand what truly happened and there were a few themes at play. For one, because of all the turns that I was getting wrong and how badly I was getting them wrong, it caused everyone, including myself, to misevaluate the quality of the position. Objectively, the position was very much still winnable. The second most important factor is that while Aaron definitely still had an advantage, he needed to be precise about his decisions, and it was not an advantage that could be converted into a win by trading down. He did not have enough tools to adequately deal with Incineroar and Raging Bolt in an end game and needed to maintain the advantage throughout instead of trading. The first key turn was when he went for Roost instead of KOing Ursaluna, which allowed me to stagger my switches, prevent Incineroar from getting Mirror Armored, and crucially, allowed Ursaluna to get chip damage on Amoonguss to knock it down in range for Knock Off. The second was when he risked Corviknight getting KOed by Thunderbolt in exchange for a Spore. Even if he got these two turns correct though it was still unclear if he had enough pieces to close out the game versus Incineroar and Raging Bolt, despite the score advantage.
Game 3 was much more traditional, but I started off terribly when Aaron called an aggressive play from Ursaluna and removed its Flame Orb before it could activate. While this was not game losing for me, it did really reduce my options as I could no longer reliably combat Amoonguss in Trick Room, and Ursaluna’s power was diminished. In the middle game he KOed my Ursaluna largely for free. I thought in that position that a Protect + Lunar Blessing was way too obvious and he could punish it by attacking Cresselia or going for Bulk Up. However, I was still in a good position with Raging Bolt + Cresselia. The crit Dragon Pulse onto Amoonguss did not matter all that much as based on the damage that it did a second Dragon Pulse would have KOed Amoonguss even without a crit, but it did give me an extra option in that I could safely Thunderbolt Corviknight, as Thunderbolt would KO Amoonguss from that range even if it went for Rage Powder. After Cresselia’s clutch 1 HP survival, it did not seem like Aaron had a good play available as he almost timed out, and he unfortunately misplayed by Sporing Raging Bolt, which was nulled because my slower Cresselia could heal Raging Bolt before it took a sleep turn. His best play was maybe to Pollen Puff his Corviknight, but I was still in a very favorable position regardless. When the game was down to my Raging Bolt + Incineroar versus Aaron’s Raging Bolt, I almost threw the game away when I didn’t Tera Bug, as I did not actually know with absolute certainty that my Raging Bolt was slower. I got way too excited after a long day and simply clicked buttons, but thankfully my Raging Bolt still moved first in Trick Room.
Rental and Pokepaste

